Translate

Monday, 23 December 2019

Something Old and Maybe Something New or Even Blue

Its that time of year when we start looking back at previous years.

So what better way to do this than go through all my computers I have had.

Photo From wikipedia
I guess it all started in 1980 with a Sinclair ZX80. My parents got me one of these for doing well in my exams. When it arrived I was in heaven, I felt like the bridge of the Enterprise had arrived in my bedroom. I was after all only 13.
16kB Ram Pack
 With it massive 1kB of memory that has considered large at the time. It was the first sub £100 computer it came in to version a build and solder it yourself for £79.95 (£337 in today's money), or a ready assembled version for £99.95 (£421 in today's money). There was quite a waiting list and I got it about three weeks after it was ordered. I bought some games from Bug Byte 4 on each cassette a version of Lunar Lander was my favourite. After about a year I upgraded to the immensely huge 16kB addon ram pack This allowed bigger programs to be written, mind you the longest I wrote by hand filled about 1.5kB. But I was still in heaven. I wrote a couple of maze type games and even a program to help with my maths home work.
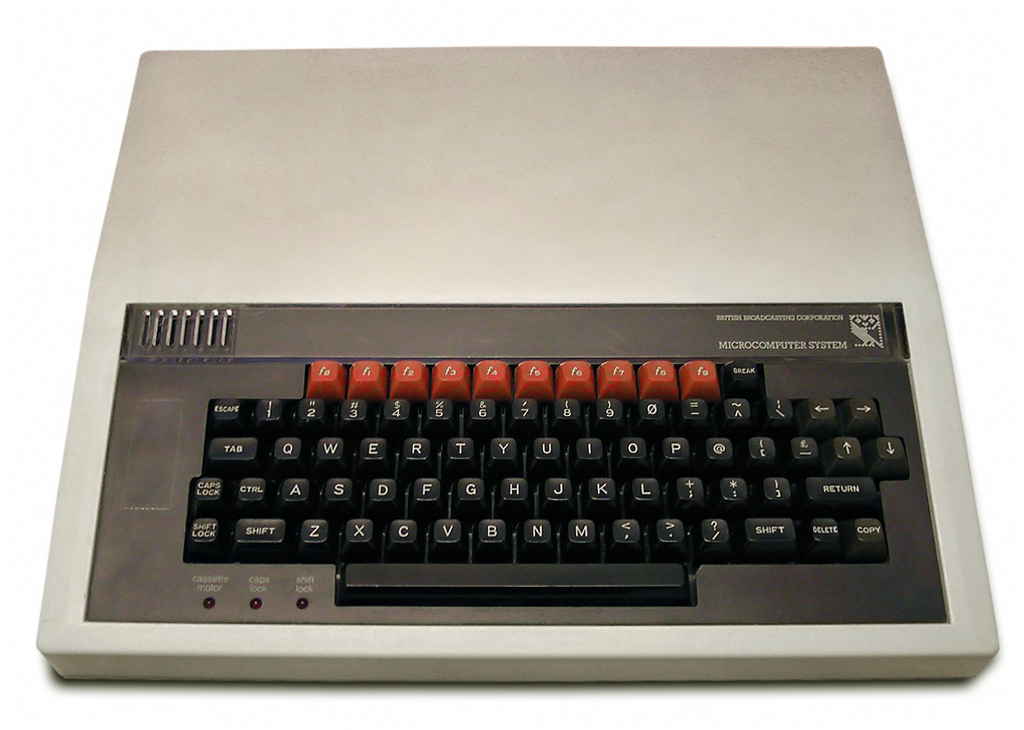

BBC Micro, Photo from wikipedia

''After the ZX80 I went straight for a BBC Micro Model B £335 (£1,161.42 in todays money), and another long wait. Being an early adopter of the Beeb meant I was an instant member of the school computer club, they got their Beebs about 2 months after I got mine. I also gained entry into the hallowed VIP room and even had my own key for this room.  Had a few issues getting it to work with my cassette player, so bought a mega cheap one and this worked fine.
Viglen PC Case
Later on I installed the floppy disc controller and had a 5
¼" floppy drive, and copied a lot of my cassette based games over to floppy. It was in 84 that I got Elite and I am still playing it now or rather the new version Elite Horizons. I did a few upgrades added more memory, made an audio interface for the analogue input socket and plugged this into my HiFi and wrote an audio visuisation program that by todays standards would still look pretty cool, even did an anaglyph  3D version which at the time was truly amazing. I then got the Viglen (Amstrad bought them out in 1994) Computer case which made the BBC more like a PC. 

My next computer was the  Acorn Archimedes 410/1 I got this in 1989 after my first year at work for £999 (£2,441.56 in today's money). I loved it, mind you I have loved every computer I had. At the time it was rather radical and was probably the fastest home PC on the market at the time. I kept this computer for about 6 years, adding more memory and a few other tweaks here and there. This computer also never crashed, something that can't be said for today's computers. 


I was an Acorn Junkie so my next PC was also from Acorn this time it was the Risc PC.  It came with a 180mB hard drive the PC emulation card, so I could run PC software such as Doom. Like the Archimedes the main operating system was stored in Rom with only a few libraries, that needed to be written to stored on the hard drive, on the 410 these wehre often on the floppy that the program came on. This gave you a very fast boot up time, something at that time with Windows 3.1 based PCs you could only dream of, and something we can only do now with Windows 10.  The case was an excellent design concept and often referred to as the pizza box. I had the same as in the picture. Like the 410 this never crashed, well apart from when a lightening strike took out the main sub station, but that doesn't really count as it was a loss of power. My house had a main power filter and I built some extra ones for the computer and my Hifi  system. 

By about 1993 I decided it was about time a built my own PC, which is what I did. Where I worked at the time, due to the licensing agreement with Microsoft, I was able to get a copy of Windows 3.11 for free, and a lot of other Microsoft software free as well.  
 I have always built my own PC except once when I bought an HP with Windows ME (stands for Multiple Errors) on it, worst PC I ever bought continually crashing, at least once a week. I then upgraded to XP almost as soon as it came out, as I had a free upgrade voucher. Yeah this will solve all my crashes and various other problems, it didn't. So came to the conclusion that it was just poorly made and had poorly executed drivers. So a year later about 2001 to 2002 built a PC and Installed XP pro on it. This crashed but not as often as the HP did. So from that day on I have never bought a desktop PC, I have always built my own. 


Monday, 4 November 2019

Blackview BV9700 Pro Review

I have finally decided to upgrade my phone.

Spent about a month looking for one, and decided I wanted to go for a rugged one.

Liked the look of the Doogee S60, but after seeing so many mixed reviews decided against it.

Then I discovered a company called Blackview, they have an office in Spain. The main company is based in Hong Kong.

So I went for the BV9700 Pro. Their online shop had it out of stock so got it from Amazon, I decided to go for the more expensive version which comes with a nightvision camera add on, more about this later. I paid 409.99 euros for mine, if you want it without the external camera it costs 388.99 euros. Which considering the cost of some phones is quite a good bargain, considering a Samsung A80 is about 500 euros and its not even water resistant let alone waterproof.


Specs

  •  CPU - This is an octa core MediaTek MT6771V Helio P70  (4 x Arm Cortex-A53 2.0GHz and 4 x Arm Cortex-A73 2.1GHz) 
  • GPU Arm Mali-G72 MP3 900MHz
  • Multi-Core APU 525MHz
  • Ram 6GB
  • Rom 128GB
  • Battery 4380 mAh
  • Screen Amoled, FHD with notch, 5.8"
  • Resolution 1080 x 2280
  • Two Samsung rear cameras 16 Mpixel and 8Mpixel
  • Front Samsung camera 16 Mpixel 
  • Waterproof USB C port
  • Dual nano sim or one nano sim and one TF memory card
  • Fingerprint sensor
  • OTG
  • Compass
  • Bluetooth
  • Android 9.0
  • Wifi 
  • GPS + Glonass + Beidou
  • Supports Wireless charging @10W and fast charging.
  • IP68 / IP69K / MIL-STD-810G
  • Air quality sensor
  • NFC
  • Weight 283g
So what is it like. 

Picture taken from Blackview website.

Unboxing the phone you get the phone complete with a screen protector already attached, just carefully peel off the top layer. A charging cable and rapid charger, and a USB C to USB C adaptor. The USB C socket is a little deeper than a normal one. The supplied charging cable doesn't need the adaptor so I guess they added it if you want to use a different USB C cable. And of course a manual more about this and the adaptor later. 

The first thing you notice is that its not a small phone and it is a little heavy, but fits well in my hand. It definitely feels solid and well built.  The buttons are easy to access and have a nice feel, the main power button and the smart button have different textures to them so you can easily identify them in the dark. 

 In use the phone is great, I have always struggled to use my smart phone as an extension of the office. Reading emails was ok but never really got on with writing them on the phone. This phone has changed that. I have been able to answer emails on it when out and use it more like an extension of the office when out and about.

Warning the manual is worse than useless, its actually a cut and paste from another phone so some of the instructions are wrong. Inserting the sim card for example tells you to insert a tool into the pin hole to eject the sim card drawer. That's actually completely wrong. You just insert a small screwdriver into the slot above the TF/SIM CARD cover and carefully pry the drawer open.  The drawer then pops out, and you can now insert your sim card or two and push it back in. This is perhaps the only bit that might over time be liable to fail, if you change sims cards or TF cards often. I think for most people who insert and forget it should be ok. 

Over the years Google has made it much easier to move to a new phone, and this time it was by far the least troublesome. All of my contacts and most of the apps got transferred over to the new phone with out much input from me. So I would say in general it was a much better experience than in the past.

The fingerprint sensor is very good and unlock takes milliseconds if not quicker. Its as quick as just touching the sensor. This is a vast improvement over my old phone an Ulefone Betouch3 which had a noticeable delay.

The other thing with the fingerprint sensor is it can be used as your login to various apps that support fingerprint log in. This means that I can log in to my two banking apps using the fingerprint sensor, and various other apps which require passwords to login. Which my old phone couldn't do.

With it having an NFC sensor I was quite keen to store my cards on it. So one of the first things I did was set up Google pay with my debit cards. The only problem I had was that only one of my debit cards worked and the other one from a different bank didn't. Went in to see my bank about the card not working. They told me I had to use their own wallet app. Downloaded their wallet app added my card, and it doesn't work.  Google pay works very well and is quite useful, no more fumbling for my debit card just whip out the phone select Google pay and tap the card unit. 

Of course since its waterproof you are going to want to try it underwater. The phone has no extra protection for the USB C socket, which has concerned many people. The new Iphone Xr  has no cover on its socket either and that is also waterproof.  One thing I have noticed is that a standard USB C plug doesn't actually fit. The Blackview one is a little longer. This might have something to do with the waterproofing. I have noticed that there is a very small amount of resistance when pushing it in. ( I did see a review on amazon where the purchaser said he couldn't get the phone to charge I don't think he pushed the cable in far enough) I think what is happening is you are pushing against a small sprung loaded door, which seals the socket from water.  Which is why the depth rating is 1.5m for no more than 30mins, (any more and the door starts to open, as I said its my theory so may be completely different in reality). 

To take photos underwater you must first put the phone in underwater mode this then disables the touch screen. Then volume up becomes take photo and volume down selects mode, so you can also shoot underwater video (didn't try this). The photos look amazing and are on par with the the Iphone Xr, which my daughter has. To exit just push the power button. This button has a red ring round it so its easily identified. 

The add on night vision camera is an optional extra which I went for. First of all you have to install the software via a QR code. But wait what you actually need to do is install a QR code reader app to do this, since the phone doesn't come with one.. Once the Night Camera app is installed it opens straight away when the night vision camera is plugged in via the USB C socket. This external camera is not water proof or  shockproof which is a shame. 


This is a video using the Night Vision Camera


This video is taken with the phone's camera


Picture quality in low light is the best I have ever seen, as can be seen on the two videos posted here. Its also pretty good in daylight and would make a good dash cam on a car, motorbike or bicycle. The camera itself has a sprung loaded clip so it can be mounted almost anywhere. It has two buttons on it one for pictures and the other for video, the button block also has a small  hole where the microphone is.  The lens is protected with a lens cap when not in use so can be stowed away with out worrying about scratching the lens when you don't need it. Would have liked to have seen some sort of lens cap keeper as I can see the cap getting lost.


Battery life is very good, it took me 38 hours of average use to get it to 15%. By average use I mean web browsing, checking emails, playing the odd game (nothing fancy like Fortnite or PUBG) and the odd 5 minute Youtube video. So you should easily get a good days worth out of it with heavy use.


The phone can also be charged wirelessly , but make sure the wireless is charger is rated at 10W and not 5W. The first one I bought which looked like a beer mat didn't work as it was rated to 5W, but works on the iPhone Xr. The second one I bought which is more like a phone stand works well. 


The phone comes with selection of pre-installed toolbox apps. 

The main one for me is the air quality monitor, so when I am crawling around in the crawl spaces under houses I will know if its safe. (I install home automation systems and home networks when I'm not blogging) Some of the others could be useful depending on what job you do. 

The heartbeat monitor works well but don't press the sensor on the back to hard as it won't work. Many people think this is the fingerprint sensor.

Haven't used any of the other toolbox apps there are 15 in total (14 if you don't have the night camera add on) ranging from Sound meter, compass, pedometer to plumb bob.

So Pros and Cons:

Pros:
Excellent value for money
Night vision camera a good add on.
Useful set of toolbox apps
Fast response from phone
Good amount of storage 128Gb
Wireless charging 
Battery life

Cons:
Some might find it heavy (but hey its a rugged phone)
Instruction manual rubbish at best
Night vision camera not easy to install
No QR code reader app (which you need to install the night vision camera)


Monday, 16 September 2019

Voyo i8 Android Tablet

I have had my Voyo Tablet for about 9 months now, and its rubbish. And I haven't used it for abut 3 months. The battery life is appalling, lucky to get 90 minutes out of it on a good day. 

 The tablet has developed a small curve, and the front screen bezel has started to pop out and I think because of this it has caused the touchscreen to malfunction from time to time, its a shame because it looked quite good on paper. It might be a fake one. I am going to contact Voyo about it and see what they can do. So no review about it.
The photos below show the curve and the pooped front bezel.


Spot the curve

Screen Bezel